How to install Ghent University's printers on Ubuntu
- Merlijn Sebrechts
- Linux , University
- November 14, 2026
Table of Contents
Ghent University uses Ricoh Streamline NX for secure printing. The current official guide to add the printers to Ubuntu is quite outdated. It guides you to an old LPD protocol that doesn’t seem to work anymore, and it uses an old settings tool that is gone in modern versions of GNOME.
The following guide explains how to configure the printer using the SMB protocol. Since this is what the Windows machines use, more people will yell when it breaks.
Step 1: connect to the UGent network
You need to have a wired connection to the UGent network or use UGent VPN. The IDLab VPN will not work. Once you are connected, proceed with the following steps.
Step 2: Add the printer
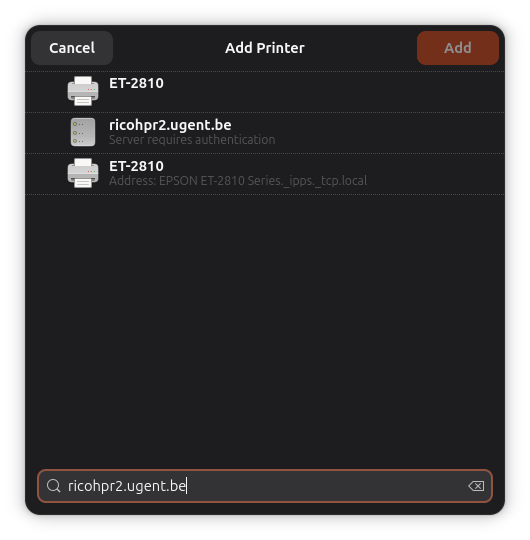
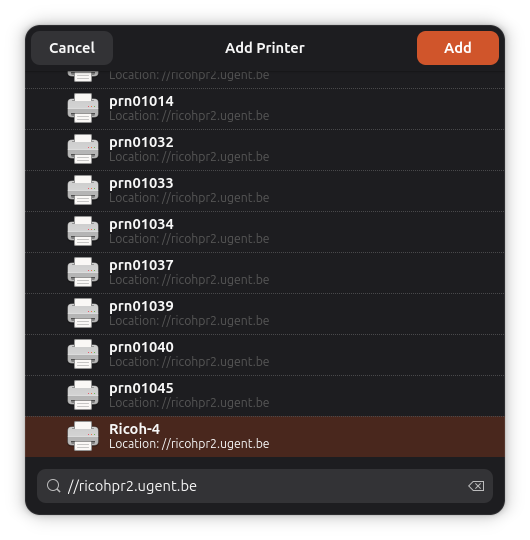
Open Settings → Printers and click Add Printer. In the search field at the bottom, type ricohpr2.ugent.be. The server appears with the note “Server requires authentication”. Click it.
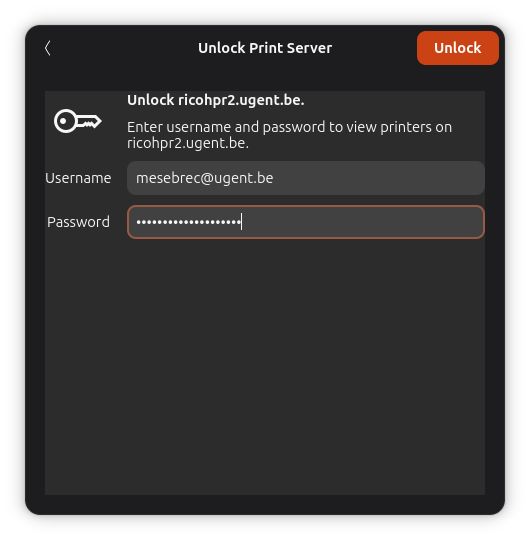
Log in with your UGent account. Enter your username as username@ugent.be, and click Unlock.
You now see all print queues on the server. Select the bottom one named Ricoh and click Add.
Step 3: Choose the driver
Ubuntu already includes the right driver, so you don’t need to download anything. If Ubuntu asks for a driver, or to change it later: open the printer’s menu in Settings → Printers, choose Printer Details, and then Select from Database.
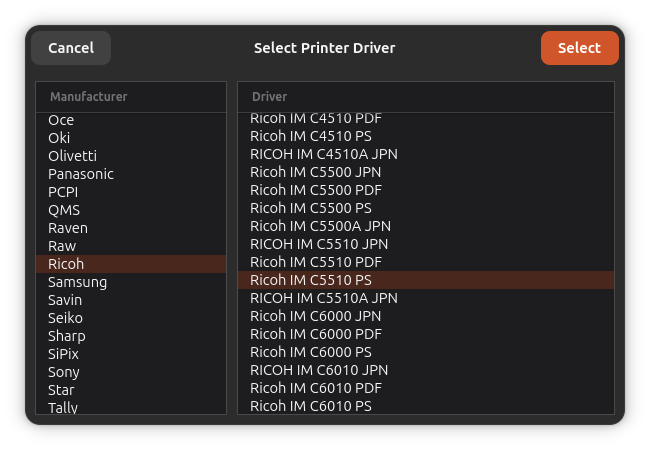
Under Manufacturer, choose Ricoh. Under Driver, choose Ricoh IM C5510 PS, and click Select.
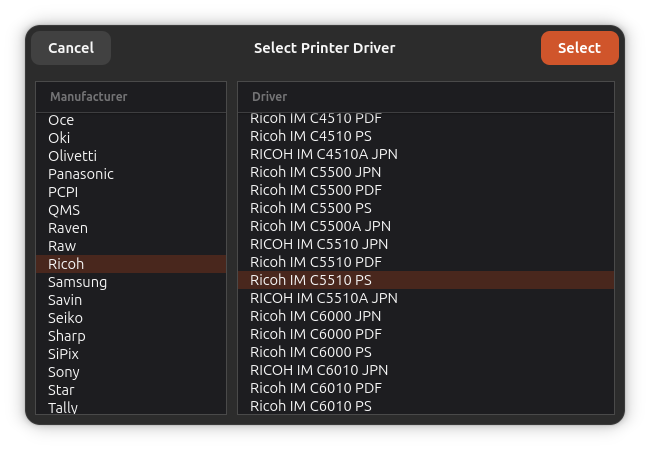
ℹ️ Many drivers have PS (PostScript) and PDF variants. The difference is in what your computer sends to the printer: low-level PostScript instructions or a high-level PDF document. PS (PostScript) driver is preferred because it more accurately prints what your computer sees. Your computer does the heavy lifting of interpreting the document instead of the printer. Printers often have trouble interpreting fonts and rendering dynamic content. The downside is that your computer might take a bit longer to print a large PDF, as it must first convert it.
Step 4: Set the finisher
The Ricoh IM C5510 on the 10th floor of iGent has a finisher. Tell the driver it’s there, so the print dialog offers stapling and hole punching. Open the printer’s menu in Settings → Printers and choose Printer Options. Under Installable Options, set Finisher to Finisher SR3310. Leave the other options as they are.
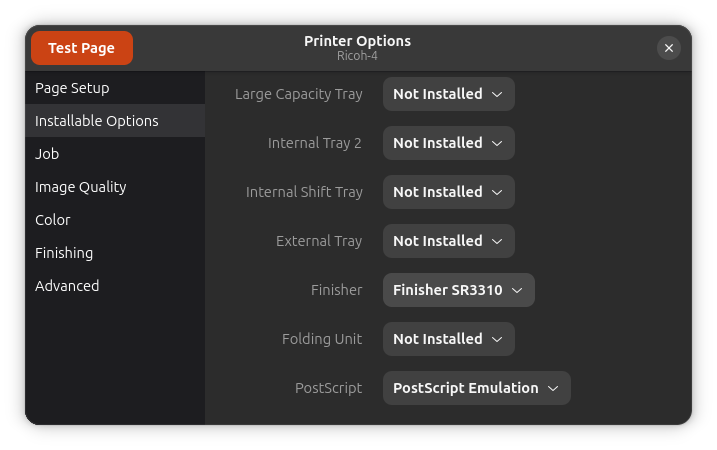
Jobs go through one queue to all UGent Ricoh printers. Finishing options only take effect when you release the job at a printer that has a finisher. Finisher settings that the printer does not understand simply get ignored.
Step 4: Save your login in the printer
To print, you need to fill in your username and password again. However, there is a bug in the Linux printing stack: this prompt doesn’t reliably get shown. As a result, you need to save it inside of the CUPS config.
This is a bit difficult because both your username and password need to be encoded correctly. The following python helper script encodes the URL. Open a terminal, run the command, and type your username and password when asked. It temporarily saves the encoded information in a shell variable called URI .
URI=$(python3 -c "import sys,getpass,urllib.parse as u;sys.stderr.write('UGent username: ');sys.stderr.flush();n=sys.stdin.readline().strip();p=getpass.getpass('UGent password: ');print('smb://'+u.quote(n+'@ugent.be',safe='')+':'+u.quote(p,safe='')+'@ricohpr2.ugent.be/Ricoh')")
Then run the following command to save the new URI with encoded username and password. Note that if the printer you just added has a different name, then you need to replace “Ricoh” in this command.
sudo lpadmin -p Ricoh -v "$URI" -o auth-info-required=none -o printer-error-policy=retry-job; unset URI
Note that this stores your UGent password in plaintext in /etc/cups/printers.conf. However, only root can read that file.
Then print a test page with the Test Page button in Printer Options, log in at a Ricoh printer, and check that it’s waiting in your inbox, and that you didn’t have to fill in your password again.
Step 5: Print!
After setup, you can print from any app with the normal GNOME print dialog. However, you need to be connected to the UGent network either by cable or by UGent VPN. The IDLab VPN does not suffice.
Good to know
- Changed your UGent password? Printing stops working until you repeat step 4 with the new password.
- Renamed the printer? Renaming recreates the printer without your saved login, and printing breaks. Repeat step 4 with the new name.
More commands for nerds
To test your UGent login over SMB, run the following command. It should list the shared printers, including Ricoh.
smbclient -L //ricohpr2.ugent.be -U 'username@ugent.be'
To check that Linux doesn’t ask for a password anymore, run the following command. It should show auth-info-required (keyword) = none.
ipptool -v ipp://localhost/printers/Ricoh get-printer-attributes.test | grep auth-info-required
To check that the printer uses SMB, not LPD. The address should start with smb://.
lpstat -v Ricoh
To see a job pass through the print server’s queue, poll it while you print. Jobs only appear for a moment before Streamline NX picks them up, so run this in a loop if you want to use this to see if your print jobs reach the queue.
rpcclient 'ncacn_np:ricohpr1.ugent.be[seal]' -U 'username@ugent.be' -c 'enumjobs Ricoh'